![]()
![]()
![]()

|
|
|
|
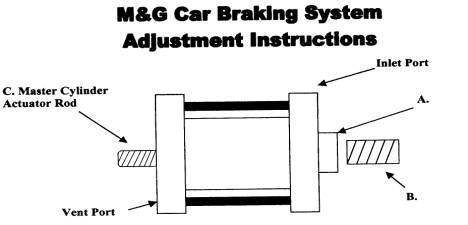
Installation-Towed Vehicle 1. Separate master cylinder from vacuum booster. 2. On certain model cylinders the vacuum booster studs are too long to install cylinder. You must shorten studs to accept cylinder. Place cylinder onto studs, if cylinder does not contact vacuum booster shorten studs. To shorten, replace nuts on studs until there is a _" between inside of nut and vacuum booster. Remove portion of stud outside of nut with a grinder or hacksaw. Be sure to cover opening of vacuum booster with tape or rag. Remove nuts after cutting this will straighten threads (dress end of stud with file if necessary). If you remove Brake System in the future, the master cylinder will fit back on shortened studs. 3. Hold M&G cylinder to vacuum booster, if there is not a gap between cylinder and booster turn adjustment counter clockwise till there is a gap. Adjust B. till there is no gap or zero clearance, plus 1/3 turn clockwise for extra clearance. Secure with 290 Loktite. Do not allow Loktite on O.D. of shaft A. Shaft A. is removable for cleaning by pulling on it (do not use pliers or scratch shaft). 4. Hold M&G cylinder to master cylinder. Adjust C. for zero clearance, plus 1/3 turn for extra clearance. Use 290 Loktite to secure C. 5. Secure M&G cylinder to vacuum booster. 6. Secure master cylinder to M&G cylinder. Before tightening bolts have someone hold pressure on brake pedal and shake master cylinder. This will allow master cylinder to center itself. Tighten bolts. 7. Place 1/8" 90 degree air fitting for _" tubing into inlet port of cylinder. 8. Run _" tubing forward between hood and grill to connect to coach. Place male end of quick disconnect on tubing. When not towing vehicle, coil tubing up and store under hood, this will keep it away from dirt and elements. This line must remain open when vehicle is being driven. If fitting is mounted on front of vehicle, it must be covered and allowed to breathe (a 90 degree spark plug boot works well).
1. Go to rear driving axle. Locate two brake actuating diaphragms. Either can be used. There will be two air lines going to each diaphragm. Find the air line that has SERVICE stamped next to it. Follow this line up to the nearest valve that is easiest to access. (There may be up to six relay valves on coach) Remove air line, remove fitting from valve. Chock wheels on coach, release parking brake, if no air pressure is escaping from opening, step on air brake to check controlled air flow. You should only have air flow when brakes are applied. Install a street tee which has one male and two females (normal pipe threads) into valve (this tee can be _",3/8",or1/2" not supplied). Reinstall original brake line and use a reducer to attach new _" plastic line. Install 1/4" line from rear brake relay valve to rear of coach. Be careful to secure the air line, keep it away from exhaust system. Install female quick disconnect at rear of coach in a desirable location using either 90 degree bracket or straight bracket. 2. Place male quick disconnect , without line attached, into female. Chock wheels on coach, release parking brake, step on brake in coach to test air flow for controlled air flow. Run air line from vehicle to coach and cut to correct length. Install male quick disconnect to air line. Connect together -brakes are now functional. To test brake system, have one person step on brake in coach while another person applies light pressure on towed vehicles brake pedal. Towed vehicles brake pedal should move when air brakes are applied on coach. (pedal will not move while towing - spring will hold in place).
|
|
Berea Automotive Engineering Corp. Last modified: 03/27/08 |